ภาษาเกาหลีเบื้องต้น
เป็นภาษาเกาหลีแบบพื้นฐานลองหัดดูนะ
안 녕 하 세 요?
(อัน นยอง ฮา เซ โย) สวัสดี
이 릉 이 무 엇 이 지 요?
(อี รือ มี มู ออ ซี ชี โย) ชื่ออะไร
안 녕 하 세 요? (...)입 니 다.
(อัน นยอง ฮา เซ โย...อิม นี ดะ) สวัสดี ฉันชื่อ....
반 갑 습 니 다.
(พัน กับ ซึม นี ดะ) ยินดีที่ได้รู้จัก
어 떻 게 지 내 세 요?
(ออ ตอ เค ชี เน เซ โย) เป็นอย่างไรบ้าง
천 천 히 말 씀 해 추 세 요.
(ชอน ชอน อี มัล ซึม เฮ ชู เซ โย) พูดช้าๆหน่อย
어 디 가 세 요?
(ออ ดี คา เซ โย) ไปไหน
피 곤 하 십 니 까?
(พี กน ฮา ชิม นี ก๊ะ) เหนื่อยไหม
영 화 구 경 가 시 겠 어 요?
(ยอง ฮวา กู คยอง คา ชี เกส ซอ โย) ไปดูหนังไหม
오 늘 저 녁 시 간 이 있 습 니 까?
(โอ นึล ชอ นยอก ซี กา นี อิส ซึม นี ก๊ะ) เย็นนี้ว่างรึเปล่า
이 리 오 세 요
(อี รี โอ เซ โย) เชิญทางนี้
얼 마 입 니 까?
(ออล มา อิม นี ก๊ะ) เท่าไหร่
또 뵙 습 니 다.
(โต พเวบ เก็ส ซึม นี ดะ) พบกันใหม่นะ
편 히 가 십 시 오.
(พยอน ฮี คา ชิบ ชี โอ) ขอให้เดินทางโดยสวัสดิภาพ
생 일 을 축 하 니 다.
(เซง อี รึล ชุค ฮา ฮัม นี ดะ) สุขสันต์วันเกิด
당 신 을 사 랑 합 니 다.
(ทัง ชี นึล ซา รัง อัม นี ดะ) ฉันรักคุณ
고 맙 습 니 다.
(โค มับ ซึม นี ดะ) ขอบคุณ
미 안 해 요.
(มี อัน เฮ โย) ขอโทษ
괜 찮 습 니 다.
(เดวน ชัน ซึม นี ดะ) ไม่เป็นไร
여 보 세 요?
(ยอ โพ เซ โย) ฮัลโหล
네.여 보 세 요?
(เน.ยอ โพ เซ โย) ค่ะ/ครับ ฮัลโหล
วันจันทร์ที่ 20 มิถุนายน พ.ศ. 2554
วันพฤหัสบดีที่ 26 พฤษภาคม พ.ศ. 2554
How Do I Install the Exchange 2010 Management Tools?
Question: How do I install the Exchange Server 2010 management tools on my workstation?
The Exchange Server 2010 management tools can be installed on a computer running one of the following operating systems:
Open the Control Panel, click on Programs and then click on Turn Windows Features On or Off. Enable the features shown here.
 Download the Exchange Server 2010 SP1 installation files and extract them to a temporary folder on your computer. From that folder launch Setup.exe. If your computer is missing either the .NET Framework or Windows PowerShell pre-requisites there will be links for Step 1 and 2 to download and install them.
 Otherwise click on Step 3 and choose Install only languages from the DVD.
 Next, click on Step 4 to begin the installation.
 Click Next at the introduction page, then accept the license agreement and click Next, then choose your preference for Error Reporting and click Next again.
At the Installation Type page choose Custom Exchange Server Installation, and also tick the box to Automatically install Windows Server roles and features required for Exchange Server and click Next.
 Select the Management Tools role and click Next.
 When the Readiness Checks have completed successfully click Install.
 After the install has completed you can launch the Exchange Management Console from the Start -> All Programs -> Microsoft Exchange Server 2010 menu.
The Exchange Server 2010 management tools can be installed on a computer running one of the following operating systems:
- Windows Vista 64-bit with Service Pack 2
- Windows 7 64-bit
- Windows Server 2008 64-bit with Service Pack 2
- Windows Server 2008 R2
Open the Control Panel, click on Programs and then click on Turn Windows Features On or Off. Enable the features shown here.
Enable Windows 7 features required for Exchange Server 2010 management tools
Install pre-requisites for Exchange Server 2010 SP1 on Windows 7
Choose language options for installing Exchange Server 2010 SP1 on Windows 7
Begin installation of Exchange Server 2010 SP1 on Windows 7
At the Installation Type page choose Custom Exchange Server Installation, and also tick the box to Automatically install Windows Server roles and features required for Exchange Server and click Next.
Custom Exchange Server installation for installing management tools on Windows 7
Installing the Management Tools role for Exchange 2010 on Windows 7
Begin installation of Exchange 2010 management tools on Windows 7
How to use a wav file as Music on Hold
How to use a wav file as Music on Hold
Create the announcement extension.
1) In CM, build an announcement. Announcement Name: cannot contain any spaces or special characters. In this example I used:Annc Name: Music1
Annc Type: integ-mus
Pick a VAL board where music will be stored. Rate will be left at 64.
If you do not want this file to be overwritten, select “Y” for Protected.

Capture of Music File from CD
1) Insert CD into drive on PC, open music with Windows Media Player.2) Check the box next to the music file you want to RIP.
3) Now select RIP – Format – WAV (Lossless)
4) Now Select RIP – Rip “Unknown Album…..” NOTE – your specific filename will be in this field.

5) After the file is RIP’d Media Player will probably give you this message;

Just click “OK” – it is nothing to worry about.
6) Windows Media Player will save the RIP’d file to the default directory (c:\Documents and Settings\jbstep\My Documents\My Music) where “jbstep2” is the actual user name of whoever owns the PC.
7) Wherever you place the file, make sure to rename it exactly the same as the announcement name in the PBX. This example is “Music1”.

Converting the WAV file to VAL format specifications
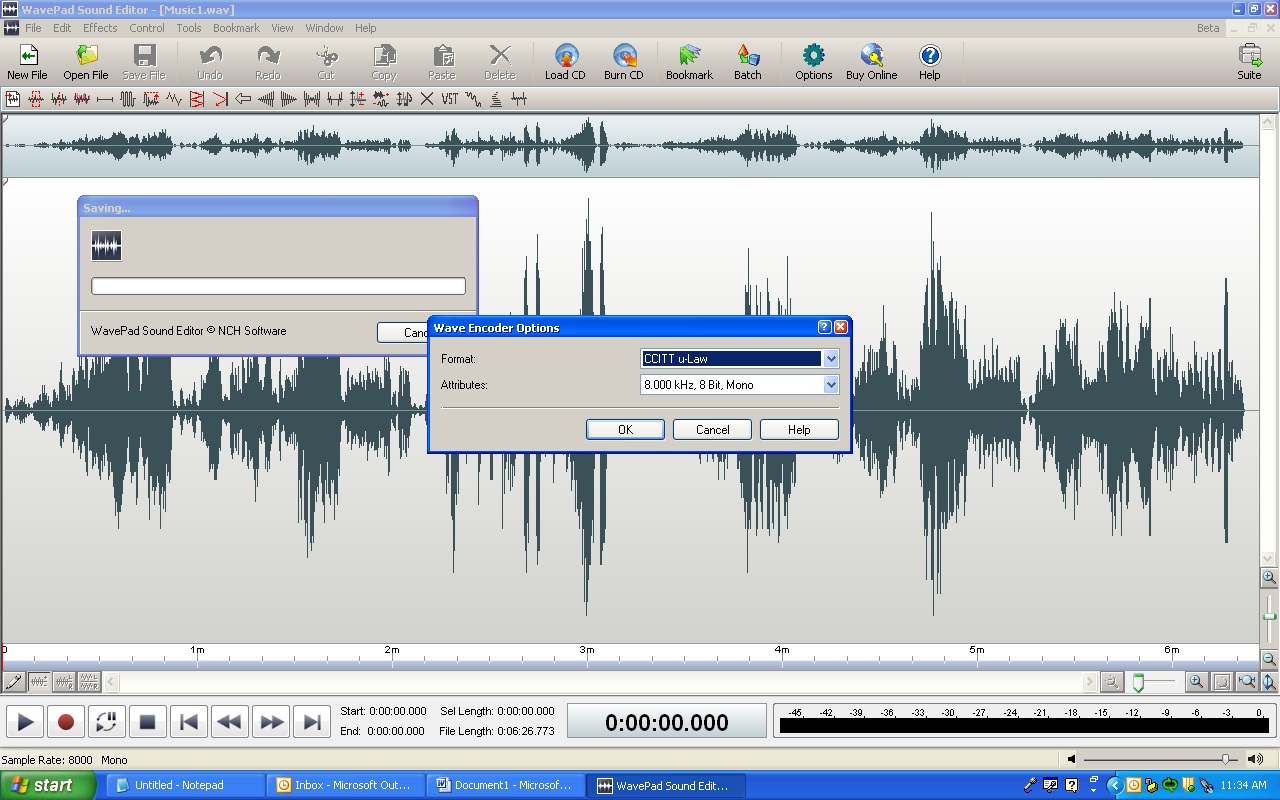
1) Using any sound recording software available, you’ll need to down convert the WAV file into the proper format. I used a free program from NCH Software (http://www.nch.com.au/index.html) called – Switch Sound File Converter. Whatever program you use, ensure that it does not imprint the converted sound files with a brand name or audio-logo.My procedure will outline how to make the conversion using the NCH software. If you use something else, the procedure will be similar in concept, but you’ll have to figure it out.
2) Open your source file (the music you want to convert) by clicking FILE – OPEN– then Music1.
3) Click EDIT – CONVERT SAMPLE RATE – 8000
4) Click EDIT – CONVERT CHANNELS – MONO
5) Click FILE – SAVE AS – (place the file where you can find it) – then SAVE – Wave Encoder Options – Format = CCITT µ-LAW Attributes = 8,000khz, 8bit, MONO (should be preset already)
6) Click OK
The music file should now be down converted into the proper format. Remember exactly where this file is now. It would be a good idea to play it all the way through once (to be sure nothing unusual or offensive has been recorded).
VAL Manager Setup and Insertion of File
1) Open VAL Manager – Click System – Register Voice System
2) Populate the Voice System Name and IP address of your CM. Leave port at 5022 (if you are connecting via SSH, which you should be).
3) Input the Login Name: and Password: to access the CM. You may want to setup a login just for VAL Manager in CM, just to keep track of all login activity.
4) Click OK to commit changes.
2) Populate the Voice System Name and IP address of your CM. Leave port at 5022 (if you are connecting via SSH, which you should be).
3) Input the Login Name: and Password: to access the CM. You may want to setup a login just for VAL Manager in CM, just to keep track of all login activity.
4) Click OK to commit changes.

Backup and Capture VAL Board Information from CM
Back up: First thing to do is execute a full system backup of all VAL and vVAL board files to your local PC (or wherever drive you choose)
1) Right Click on Voice Systems (located in left hand pane).
2) Select Back Up All
VAL Manager will begin a full backup of all announcements stored on VAL and vVAL boards. These files are saved at: C:\Documents and Settings\OWNER\Application Data\Avaya\Voice Announcement Manager\user\VOICE SYSTEM. NOTE – the red highlighted folders will be unique to the PC owner and the VOICE SYSTEM will be the name of your system in VAL manager.
Capture of VAL Information:
1) Right Click on your systems name (example here is VA_ORM)
2) Select Get VAL Board Information
3) A Get VAL Board Information status window will display.

After complete you’ll see an acknowledgement window which will affirm a successful download.

Transfer of WAV file into VAL board
1) Click to open your system (example VA_ORM)2) Open Audio Sources
3) Open Default Folder
4) Right Click the VAL or vVAL board you want the WAV file to reside on.
5) Select Copy / Delete Audio Files

6) Retrieving Announcement Properties progress window will appear. Right now the VAL Manager is collecting all the specific announcement / music files already resident on your chosen VAL or vVAL board.

7) Once the Copy/Delete Announcement Files window appears use the “Change Folder” button to navigate to the converted WAV file.
8) Your source file will be in the left hand pane (Files on Local PC).
9) Select your source file, then click on the single > button. This will automatically begin the transfer of your WAV file into the VAL or vVAL board. Remember – the source file name has to be exactly the same as the announcement name you created in the CM. Once the file transfer begins, VAL Manager will install the WAV file on top of the already existing announcement. If the two names are not the same, you’ll have an unassociated file to deal with in the CM. That is not a show stopper, a little poking around will get the file properly associated, but it is easier to just make everything line up from the beginning.

10) “Copying Audio Files to….” will appear. This shows you the status of your transfer.

11) Then the VAL Manager will begin Copying the file to the VAL or vVAL board (this is a good indication that everything is working properly)

12) Once completed, the Copy files Task window will be displayed. Any ERRORS means a failure. Refer to my Troubleshooting section at the end of this procedure.

Checking your File
To make sure your file has indeed been transferred, double click the VAL board. This will download all the file information for that board. Look for the Music1.wav file. Scroll to the right, look in the Length column. There will be a value here displayed in seconds. This example shows 374 seconds (a little over 6 minutes). You file has arrived.

Configuring CM for Music On Hold via VAL
1) Execute change moh-analog-group 1
2) Populate field 1: with VAL board address.
3) Enter (f3)

Place a call to another phone on the same system, place on hold, and listen for music.
Troubleshooting
The only issues I encountered were all caused by the same thing, not having the WAV file in the proper format. The answer came from the VAL Manager HELP file. That document told me everything I needed. The WAV file text states the following;
Under Using Voice Announcement Manager –
Creating and Converting Audio Files –
VAL Audio Format Requirements –
- “CCITT A-Law or CCITT µ-Law companding format (do not use PCM)
- 8KHz sample rate
- 8-bit resolution (bits per sample)
- Mono (channels = 1)
Mu-Law companding is used in the United States, while A-Law is used internationally. Ensure that you use the same companding format as the administered format on page 1 of the system-parameters country-options form.
If any of these parameters are not correct, the WAV file will not transfer. You will see it trying to transfer, but the attempt will result in ERRORS.
After I fully converted the WAV file correctly, everything worked as designed.
Lastly – MOH sourced from a VAL board works great. The file will loop over and over automatically. The music begins from the beginning as soon as the caller is placed on hold. TN 2501AP VAL boards can store up to 60 minutes of audio. A vVAL board can store up to 15 minutes of audio. It always works and the volume level is perfect (I do not know of any way to change the audio level once the file is installed on the VAL or vVAL board. If a lower volume is required, adjustments can be made in the Sound Recorded software, then re-save and transfer new file into system).
How to configure EC500 on Avaya CM – EC500 Part 2
How to configure EC500 on Avaya CM – EC500 Part 2
We discussed in the previous article what is EC500 and what we need to set it up. In this article we will go over the setup process. There are two parts of the setup process. The first step is to be done only once (defining the config set). Once the config set has been defined to add a new user start from step 2. First make sure you have enought EC500 licences. You can see your number of station licences and ec500 licences if you run the command display system-parameters customer-options. Look under Maximum Off-PBX Telephone – EC500.
1.Define a config set like the one you see bellow. I’m also using Avaya OneX Mobile so that’s why you see this title in here. As you can see in my case i have enabled the Confirmed Answer to y (will cause my user to press a number key to confirm that they answered the call). Run the command change off-pbx-telephone configuration-set [number]

2. Phone number that you will use for the cell phone. Command is change off-pbx-telephone station-mapping [extension]. As you can see my extension in this case is 7009 and my cell phone is 4165007892. There is no need for the 9 in front of the cell phone number as i defined in the trynk selection ars. Config set should be whatever number you chose in the previous step. This is page 1 of 2. On page 2 of 2 (second image bellow) setup Call limit to 2, mapping mode to termination, Calls Allowed to All and bridge calls to both. This should be it on this step.


3. Now add the extend call and the ec500 buttons on the station and you’re ready to go. Issue a change station [extension] and go over to the button config page.

Troubleshooting.
If you’re not sure if a station has EC500 enabled of disabled you can issue the command status station [extension] and look under the EC500 status.

Alsom you can enable/disable the ec500 from a station that has console permissions in it’s COS by dialing the feature access codes defined in the system. Display feature-access-codes and look under EC500 activation and deactivation codes.

Next article is optional is you wish. It’s about EC500 Advanced Features.
Using tutty in Avaya Aura
The Tool – Using tutty in Avaya Aura
Once you double click the saved session in your tutty, you will open a connection to the CM. Select the default emulation (vt100) by pressing ENTER once presented with the question. Once you have the connection open you’re actually at the Aura’s OS level (Linux in this case). There are a lot of commands that can be issued from this point (try almdisplay for example).However, to enter the part that handles the avaya aura administration you will have to enter sat and press enter at the command line.

Depending on the level access of the user you are logged in as you can be asked about a PIN. Enter it and don’t be scared by the fact that you don’t see anything typing (this is a security feature that will prevent the person behind you from guessing the number of caracters your password has).

Select the default Terminal Type [513] by pressing ENTER

Once you’re in you can issue commands like list, display, change, add, etc… (relax, we’ll go through most of them).
Here is a list of keys that you can use once you’re in
| F1 – Cancel | This will cancel the current command. Also, if you’ve used autocomplete and you wish to get back to the beginning of the field press this key |
| F3 – Accept (aka ENTER) | Once you are happy with the changes you wish to do, press F3 and the changes will be propagated into the system. |
| F4 – Erase whole field value | If you wish to erase the value in a field, you can use the backspace key or press F4 and the whole field value will be erased |
| F5 – Help | F5 will also complete the command you’re typing and will give you the available options. For example, assuming that you typed ch and press F5, the system will understand that you mean change and complete the line by typing the rest for you. Also, it will pressent you with a list of available options for that command. Note that the list of available options is dependand on the rights/permissions that the user that’s logged in has. Will cover the rights/permissions on the next module. Now, an interesting thing is that if you wish to erase a completed keyword (like change in this case), the system will not allow you. You will have to press F1 to get back to the prompt (not applicable however if you type the command and don’t press F5). Below is an example |
| F7 – Next page. | If you have a screen with multiple pages (look in the upper right corner it should say something like Page 1 of 7 for eg), you can navigate through pages using F7 to go to the next one and F8 to go to the previous one. |
| F8 – Previous Page. | Just like the previous example with F7, F8 allows you to go to the previous page. |
| R (please note – CAPITAL) | Repeat previous command. Assuming that you did a long command and wish to run it again (a trace for example), rather than typing it again, you would just press the letter R and press enter. The system will automatically do the same command that you executed previously. There is no way in tutty to go back a number of commands but ASA (avaya site administration) can. |
How to install Exchange 2010 Part 1
How to install Exchange 2010 Part 1
| เขียนโดย Sumas Kaewsangngam |
Introdutionเริ่ม ต้นกับบทความแรกของ Exchange 2010 ซึ่งในวันนี้เราจะมาเรียนรู้วิธีการติดตั้ง Product ตัวนี้แบบ Single server บน Windows 2008R2 ( Exchange 2010 support 64 bits only ) กัน โดยในที่นี้เป็นการติดตั้งแบบ First Organization คือไม่เคยมีการติดตั้ง Exchange ลงไปในระบบเลยStep-by-Step1. Raise Domain Levle ->ต้องเป็น Windows Server 2003 Level เท่านันถึงจะลง Exchange 2010 ได้  1. Copy เอาไปวาง -> Import-Module ServerManager 2. Copy เอาไปวาง -> Add-WindowsFeature NET-Framework,RSAT-ADDS,Web-Server,Web-Basic-Auth,Web-Windows-Auth,Web-Metabase,Web-Net-Ext,Web-Lgcy-Mgmt-Console,WAS-Process-Model,RSAT-Web-Server,Web-ISAPI-Ext,Web-Digest-Auth,Web-Dyn-Compression,NET-HTTP-Activation,RPC-Over-HTTP-Proxy -Restart 3. Copy เอาไปวาง -> Set-Service NetTcpPortSharing -StartupType Automatic    4.1ทำการใส่แผ่น Exchange 2010       Summaryผมว่ารูปแบบการติดตั้งไม่แตกต่างจาก Exchange 2007 สักเท่าไหร่ จะมีเพียงขั้นตอนที่ต้องใส่ External URL เข้าไปเท่านั้นเอง สำหรับ Part นี้จะพูดถึงเรื่องการติดตั้งใน Part ต่อไปเราจะมาดูวิธี Config เพื่อ Exchange 2010 ของเราสามารถรับส่ง E-mail ได้ ทั้งจากภายในและภายนอกองค์กร |

สมัครสมาชิก:
บทความ (Atom)